
A toilet flapper is the rubber stopper fitted into a flush tank. It lifts when you flush and allow water to flow in to rinse and fill the bowl. After a period, the flapper becomes old, cracks and fails to completely seal against the flush valve seat causing the toilet to run.
Now, the bills you pay for water isn’t making you happy. A working flapper cuts down your water bills and irritating noises from continuous filling. Calling a professional plumber could cost you a few dollars depending on the location of your house.
How to Replace a Toilet Flapper: Step by Step Guide
Table of Contents
In this guide, you’ll discover how you can replace the new toilet flapper in just five easy steps:
Shut Off The Water
Locate the shutoff valve in your modern toilet and turn it off. Next, remove the cover from the tank for you to see the inside. Empty the toilet by flushing it. Doing this will make it easier to replace the flapper without spilling any toilet water. In case the tank begins to fill again, recheck the shutoff and make sure you have completely turned it off.
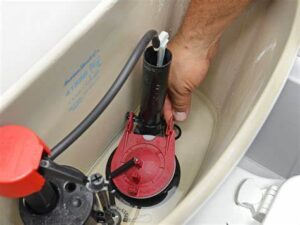
Remove The Old Flapper
You’ll found the flapper sitting on the bottom of the tank. Disconnect the chain from the arm of the plastic or metal tank lever connected to the handle.
Now, begin to twist the flapper side to side until it becomes loose. Perhaps there’s a ring that holds the flapper in place around the fill valve, slide all the way up and off. Don’t dispose of the old flapper yet, take it along to the store for a matching replacement.
Purchase The Replacement
Toilet flapper comes in three different types; they are tank ball, rubber and seat disk. Modern toilets usually have rubber flappers. Older toilet types have seat disk flappers that you can snap into place or screw-on. Also, you can find a tank ball inside the new toilet models and older models, and it’s attached through a lift wire, looks the way you’d expect.
You can get an appropriate flapper in local hardware stores based on your toilet brand and approximate age. Make sure the replacement and the old flapper look alike. If you’re not sure, ask a trained employee on plumbing products.

Install The Replacement
To install a new flapper, you can either drop, snap, slide or screw the replacement into place. Sometimes, you get confused because of the ring on the end of the new flapper, since small hinges connect the old one. Just cut off the ring and attach the same way.
Ensure that the chain is long enough to make the flapper seal. More so, it should have a few slack, but it shouldn’t be too much to catch the underneath of the flapper. Possibly, remove some links before you attach it to the arm of the tank lever.

Test It Out
After installing the new flapper, it’s now time to check if it’s correctly installed. To begin, turn on the shutoff valve to allow water flow. Flush the toilet as soon as the tank is full. Then keep an eye on the flapper to be sure it seals when it begins to refill.
Empty the tank if it runs again. Adjust the flapper until it seats properly on the bottom of the tank. Also, make sure the chain isn’t too long. You can turn the shutoff on and try again.
Once you confirm the flapper seals, cover the tank and gently pat yourself at the back. At this moment you can boast of your success to your friends, in case they might want you to replace theirs.
How to Replace a Toilet Flapper Valve
Conclusion
Henceforth, to replace the old flapper in your toilet shouldn’t be a barrier. If you go through the step by step method available in this article, it will guide you through the quick and easy flapper installation.
This Method that takes a few minutes to ensure you have a functioning toilet flapper. Upon a successful replacement, you’ll be able to smile whenever you need to use the toilet.
Knowing that you’ve stopped running water and excessive spending on water. Should in case you get confused during the process of replacement, you can get back to this guide to achieve the best result. But when all attempt fails, don’t hesitate to call on a professional plumber to help out.